When I talked to people at various meetings and conferences, I was surprised that not everyone who uses Azure knows what peering is. That’s why I decided to write a little about it and show you how to use it, because it can significantly reduce the cost of the environment on the Azure platform.
So let’s start from the beginning. The networks on Azure, as well as on-premises, are completely isolated from each other. Sometimes we wish resources from one network could access those to another. We can get to them using the public addresses of our resources, which is not very secure. Fortunately, there is also a safer way, we can connect the networks using a VPN or Peering. Express route is a separate issue that I will try to describe in a separate article.
VPN connection
VPN is the most popular, but also quite expensive solution – about $ 30 for the cheapest type. If traffic is in the same region, it is free in both directions. Another situation is when we connect 2 regions, then we have to pay extra. If we have 2 networks on the Azure platform, we can connect them using a vnet-vnet VPN connection. The networks connected in this way may be in different locations and subscriptions. The process of connecting virtual networks is not too complicated, it is similar to the process of creating an IPsec site-to-site connection (VPN site-site). Both types of connections use a VPN gateway to provide a secure tunnel that uses IPsec / IKE. The important information is that traffic does not go through the Internet, but through the Microsoft backbone network.
Peering connection
Description:
Peering is much cheaper than a VPN, here we only pay for data transfer. We have the ability to connect networks in the same region or different regions. Traffic is private and takes place on Microsoft’s backbone, nothing leaks out onto the internet. We can limit it by applying appropriate rules in the NSG (Network Security Group). Traffic can be one-way or two-way depending on our configuration.
Examples:
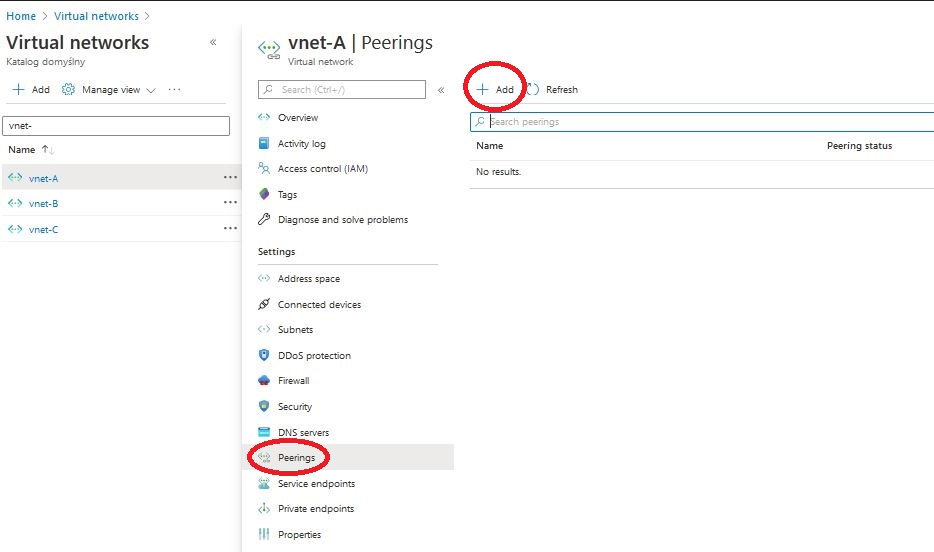
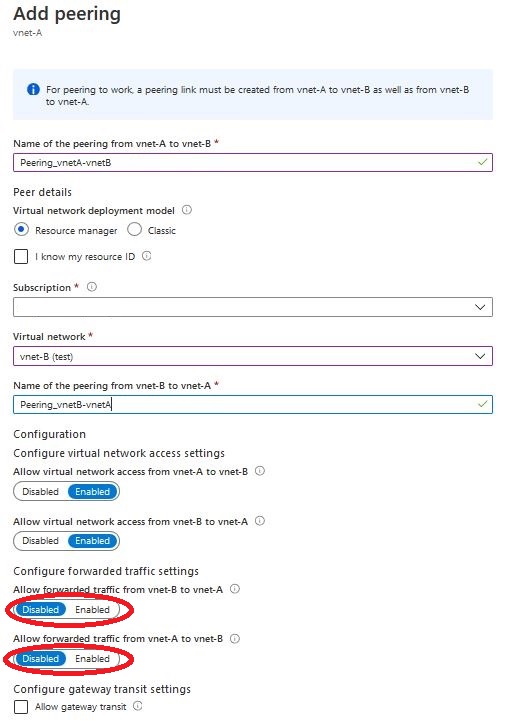
To create a peering connection, we go to the Azure portal and choose the virtual network for which we will create it. Select Peering from the network settings and click on “Add”.
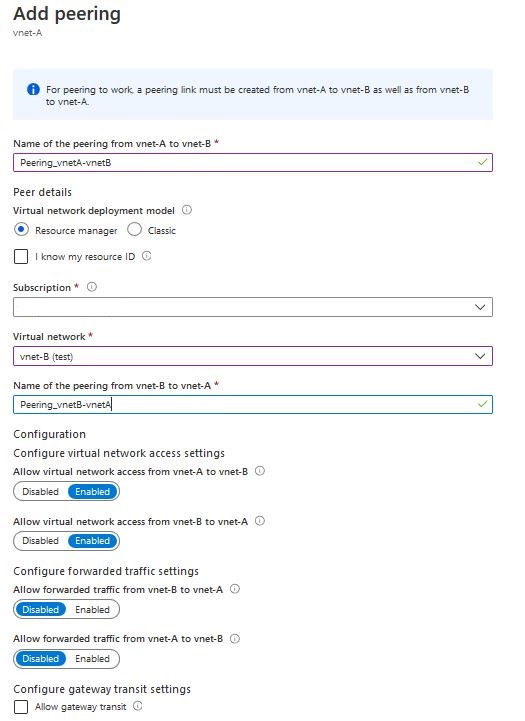
All that’s left is to fill in the form, at the beginning we give the name for the peering connection from network A to network B. Now we can indicate the subscription, resource group and network we want to connect to. If the network is in a different subscription and it is not on the list, we can check the “I know my resource ID” checkbox and enter “resource ID”. After selecting the second network, we give a name for the peering connection from network B to network A. We define whether we allow traffic between networks in one direction and the other (Configure virtual network access settings). The next option “Configure forwarded traffic settings” determines whether we allow traffic from outside networks for which peering is set. The last thing is the “Allow gateway transit” checkbox, select it if we want to allow traffic through the gateway.
Configuration:
Using a azure peering connection, we can connect more virtual networks, there is only one “but”. If we have 3 networks Vnet-A, Vnet-B and Vnet-C and we connect them as shown below. We will connect Vnet-A with Vnet-B, and we will connect Vnet-B with Vnet-C, we must remember that the Vnet-A virtual network will be able to communicate only with Vnet-B, but will not connect to Vnet-C. Vnet-C also will not be able to connect to Vnet-A.
- Vnet-A <=> Vnet-B
- Vnet-B <=> Vnet-C
If we want Vnet-A to be connected to Vnet-B and Vnet-C, we need to configure separate peering connections, separate for each network we want to communicate with. Then the movement will be direct.
- Vnet-A <=> Vnet-B
- Vnet-B <=> Vnet-C
- Vnet-A <=> Vnet-C
You can also allow traffic to be forwarded in the peering configuration. Then the traffic from the Vnet-A network to the Vnet-C network will be able to take place, but only through an intermediate network, eg Vnet-B. In order for the traffic to be transferred, additional routes must also be defined. How exactly to do it I will describe in the next blog post, which will be published soon.
For more information on virtual networks, see the Microsoft documentation: https://docs.microsoft.com/en-us/azure/virtual-network/
If you are interested in this article, check out the others on Microsoft Azure category Azure https://lepczynski.it/en/category/azure_en/